Some pretext
So this started with me being wanting to develop a new blog theme. I had explored jekyll in past but used it as secondary thing. But this time I thought let’s try jekyll out with native github actions only. Anyhow I needed an environment with jekyll installed but didn’t want to go through hassle of installing it again. Last time I installed ruby on my system it took ages to remove the installation. So initially I needed a docker type thing but now docker as its too tedious to build everytime and takes alot of space which it gets a little tough to control. Also Windows has come up with new thing called Windows Subsystem Linux. I tried it in college days and encountered and reported some bugs there. And it is same problem as with docker and ruby… didn’t want anything integrated within my system. A sandboxed environment is a happy environment. So best option which wouldn’t cost me money(Yes, talking about cloud) was trying a native good old school VM, my old sandbox.
So I installed VM on my PC and and installed Crunchbangplusplus OS which is a lightweight Debian based OS. And once I installed I instantly recognized the flaws and why many people don’t do it.
First of all, working inside a VM is very yukk(that’s the only word I could think of to describe it). Then there’s this rendering issue on smaller screen and issues with screen resolution, switching between windows and terminal setup, alot of small issues and honestly I’d rather code on my machine than on a VM… it’s just better. So I thought let’s utilize the power of ssh. This will be a two part tutorial.
Setting up ssh from Host
- So let’s first make sure ssh is running on the VM. For that you can just use the following command. If it returns any process then ssh is running
ps aux | grep sshd

- After this, let’s proceed further and setup an open port from our VM to our local machine.
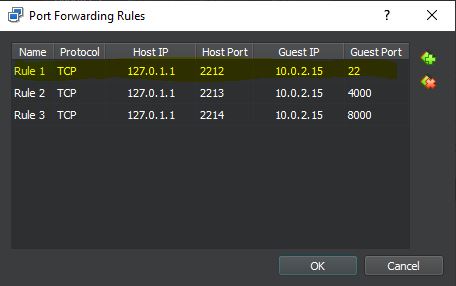
- Go to ‘Devices > Network > Network Settings’ and check if active Adapter is attached to NAT(default setting btw).
- Go to ‘Advanced’ and ‘Port Forwarding’ and setup host IP as
127.0.1.1(default loopback address for VM) and guest IP as 10.0.2.15. Guest IP can be found out by doing ifconfig on VM linux but is usually the same if VM setup with default configurations)
- After this you can use ssh from Windows Terminal or you can install putty or MobaXterm.
ssh -p <host_port> <linux_username>@<host_ip>
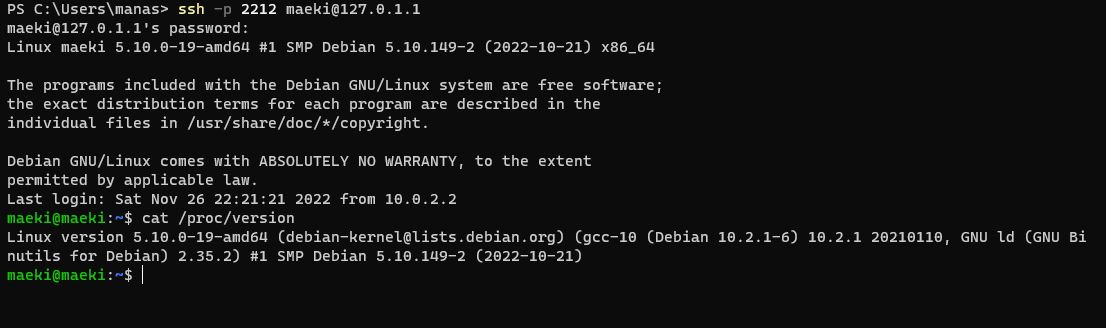
- Now you can easily access VM from your own terminal and similary can open any other port bound with
0.0.0.0 running on Guest VM and access from your Host Machine.
Setting up VS Code with ssh
-
Now I absolutely love VS Code. It has never let me down. I have been using it since 2018 and I really haven’t found a good all-rounder like this since then. I meant yeah Atom is good editor but it’s quite heavy from my perspective. Anyways, I’ll be setting up this ssh on VS Code thank to this extension Remote - SSH. Please make sure to install this first.
-
After installation just do Ctrl + Shift + P and VSCode Command Palette will open up. Type in > Remote-SSH: Connect to Host and follow along. It’s a very straight forward process after that.
After setting up ssh and opening ports you can easily use linux for your most of the development work.
PS. You can even use VS Code’s terminal for interacting with linux once ssh setup is done.